
OK, I’m feeling a bit ropey after being the guest of the kind people at AppSense last night down here in London, so for today I think we will just have a little bit of a case study in using Environment Manager to solve real-world user issues. The requirement we started with was to pin a shortcut to the Taskbar that opened up a specific HTML Help file – a file with the .chm extension. Sounds simple enough, no?
As I started to look into this it became obvious that it was not as straightforward as I thought. As far as I was aware, it was executables and shortcuts that could be pinned to the Taskbar or Start Menu – but if I created a shortcut to my HTML Help file, the “Pin To Taskbar” context menu option was not available for it. Renaming the file to a .exe extension allowed me to pin it, but when I tried to edit the shortcut properties in %AppData%\Microsoft\Internet Explorer\Quick Launch\User Pinned\Taskbar, the Pinned Item promptly disappeared.
Next I tried to pin the HTML Help executable itself to the Taskbar (%windir%\hh.exe). I was quite disconcerted to find that I couldn’t actually do this, and wondered if this was the reason that I also couldn’t pin a shortcut to a .chm file to the Taskbar either?
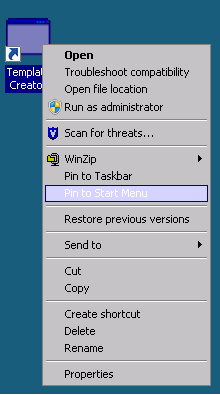
There was clearly something going on “under the hood” of Windows with regard to this pinning. Here is an example of a “normal” shortcut that has the options for Pinning (both to Taskbar and Start Menu)
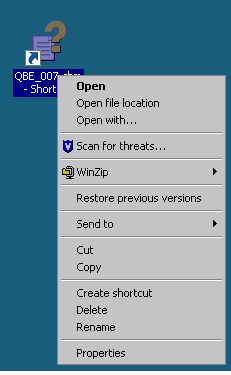
and here’s an example of a shortcut to our HTML Help file, which as you can see is minus the options for Pinning (I believe in Windows-dev land, these options on the context menu are referred to as “verbs”)
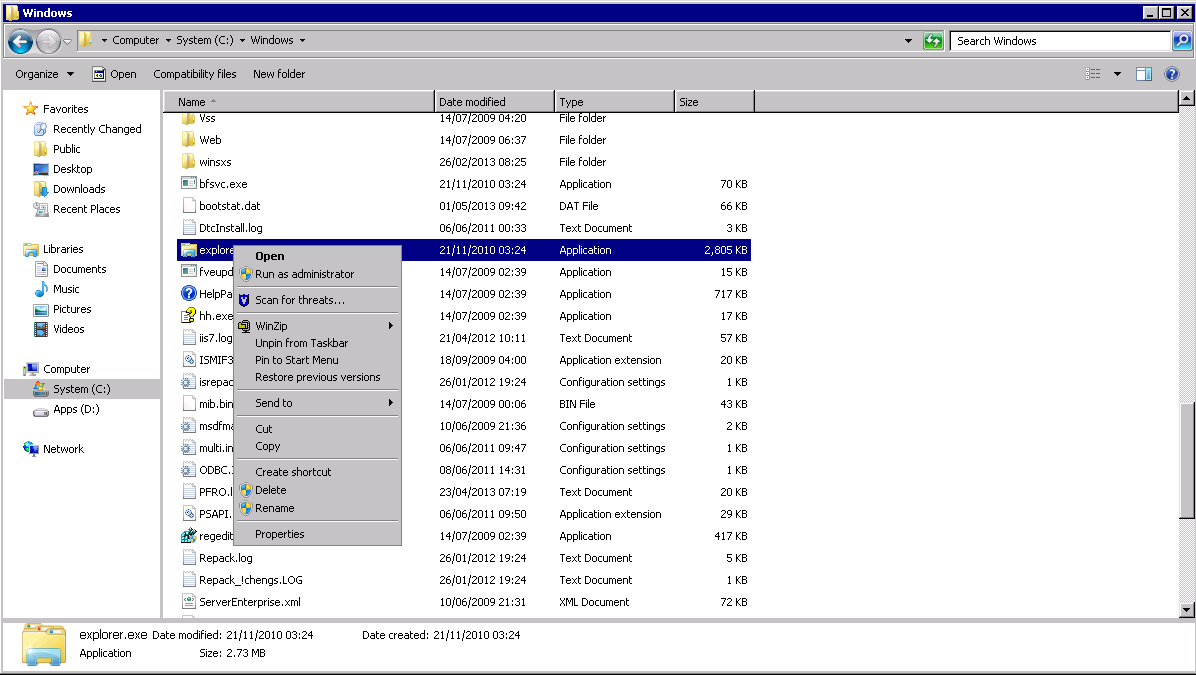
Following on from this, here’s an example of an executable (in this case explorer.exe), with all of its verbs intact
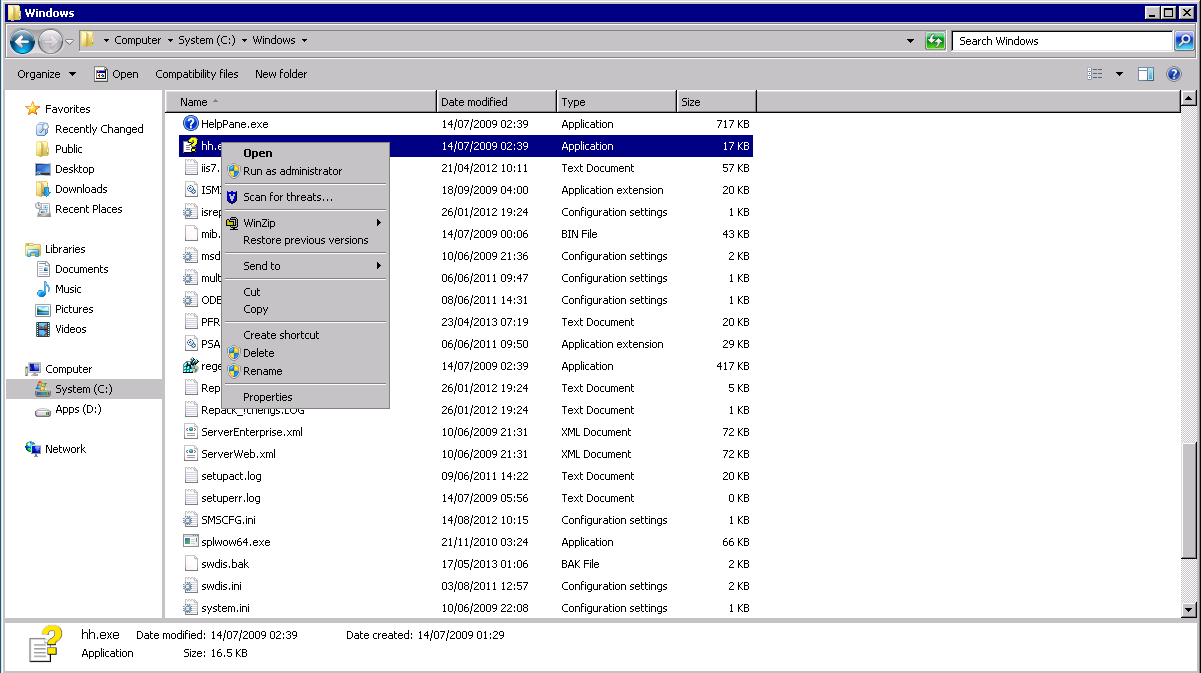
and here’s the executable for HTML Help (hh.exe), showing that the verbs we are looking for are once again missing
Strange behaviour indeed! If ever there was a time to go digging through the depths of the interwebs for information on the inner workings of the Windows OS, then this was it.
After a bit of research and Google-fu, I found to my surprise that certain executables were effectively banned from being Pinned, and were also excluded from the Frequently Used List. The list of “banned” executables is listed in the Registry at these two keys:-
HKLM\Software\Microsoft\Windows\CurrentVersion\Explorer\FileAssociation\HostApps
HKLM\Software\Microsoft\Windows\CurrentVersion\Explorer\FileAssociation\AddRemoveApps
Items listed in these keys comprise:-
Applaunch.exe
Control.exe
Dfsvc.exe
Dllhost.exe
Guestmodemsg.exe
Hh.exe
Install.exe
Isuninst.exe
Lnkstub.exe
Mmc.exe
Mshta.exe
Msiexec.exe
Msoobe.exe
Rundll32.exe
Setup.exe
St5unst.exe
Unwise.exe
Unwise32.exe
Werfault.exe
Winhlp32.exe
Wlrmdr.exe
Wuapp.exe
…with right in the middle of that lot, our friend hh.exe. This would also explain why we can’t pin a shortcut to an HTML Help file to the Taskbar either – the association with the “banned” executable in the shortcut properties must prevent the option from being available.
I’ve also noticed other, non-Microsoft programs and/or shortcuts that can’t be Pinned to the Taskbar or Start Menu. These programs must take advantage of the System.AppUserModel.PreventPinning property that is available to developers, or alternatively they can use the Registry to do this, by adding a NoStartPage entry to the application’s registration in HKEY_CLASSES_ROOT\Applications\Example.exe.
So, now that we are suitably educated, how can we go about getting our .chm file onto the Taskbar?
Well, one anomaly I did find was that although you can’t pin a shortcut to a .chm file to the Taskbar, and you can’t pin the HTML Help executable itself to the Taskbar, what you can pin to the Taskbar is a shortcut to hh.exe that references the .chm file as a parameter. In case you’re not getting what I mean, if I create a shortcut like this
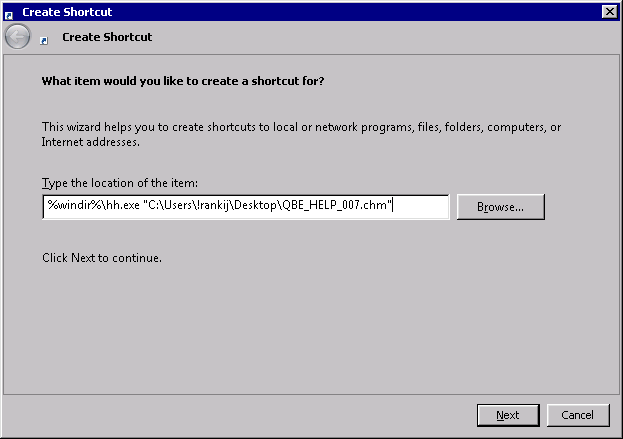
once I have the shortcut on my desktop, I can now access the verbs as normal!
So….next thought was how to deploy this. The first thing I tried was to create the shortcut in an accessible network location, but here some more anomalous behaviour exhibited itself – if the shortcut wasn’t on a local drive, the verbs were again missing. I can maybe understand the reasoning behind this with regard to trusted files – but if I was using a redirected Start Menu and I couldn’t pin items to the Taskbar because the shortcuts were sat on a remote network drive, I’d be pretty much driven bonkers by this “feature”.
Anyway – given that the shortcut needed to be created locally, and it would have to be done in an area that the user could write to, what we needed was a way to create the shortcut, pin the shortcut to the Taskbar, and then remove the shortcut we created, leaving the Pinned Item behind intact. All of this needed to be done in a nice sequential order, so if we weren’t using AppSense Environment Manager, we’d probably be having to use some sort of logon script, as Group Policy can’t really do dependent actions. But luckily, we are using Environment Manager, so it should be possible!
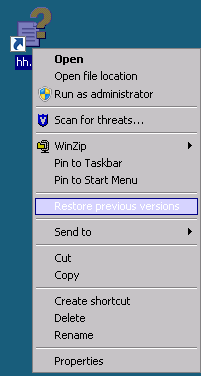
Before I started creating the required configuration, though, one more interesting piece of information was revealed. When you create the shortcut, the default name given is the name of the executable, in this case hh.exe. However, to tidy things up, I decided I was going to rename the shortcut to “Custom Help”. Imagine my surprise when, after doing the rename, I found that the verbs for Pinning had disappeared again!
After a bit more digging it turns out that Microsoft maintain a “blacklist” of disallowed names for shortcuts and executables in the Registry. Bizarre though it sounds, if any of the following strings – regardless of case – are present in the name of a shortcut or executable, they are automatically disallowed from being Pinned
Documentation
Help
Install
More Info
Read me
Read First
Readme
Remove
Setup
Support
What’s New
and as we can see, renaming the file to a string containing the word “Help” is the reason why this happened.
Obviously the easy way around this is to not use any of the blacklisted strings in the shortcut name – but as this is a Help file we are pinning, it’s kind of annoying not to be able to use “Help” in the shortcut title. The default name of “hh” also looks really unprofessional when a user hovers the mouse over the Pinned Item, so it’s clear we also need to find a way around this. The settings are controlled by the following Registry key, which should be familiar from the section above:-
HKLM\Software\Microsoft\Windows\CurrentVersion\Explorer\FileAssociation\AddRemoveNames
So hopefully we can use Environment Manager to manipulate these Registry values so that we can give our Pinned Item a sensible name!
Right – so, forearmed with all this new knowledge about the internals of Windows, we’ve finally got down to opening up the Environment Manager console and can set about trying to make it work 🙂 The first thing we will need to do is set the Registry key to allow us to use Help in the name. We will set this as a Computer Startup Action, but dependent on your environment you may need to put this into a gold/master image or maybe even use Group Policy to deploy it.
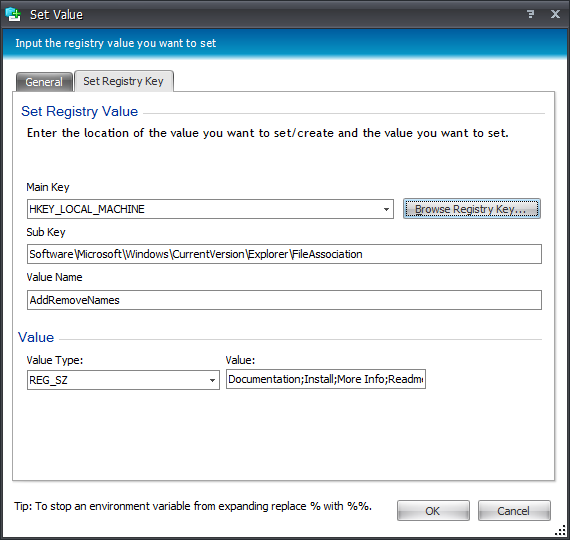
The value is semicolon-delimited and can be configured in any way you require, but if you just wanted “Help” removing, the value would be
Documentation;Install;More Info;Readme;Read me;Read First;Setup;Support;What’s New;Remove
Once we’ve set that, as it is an HKLM setting, any instance of explorer.exe that starts afterwards will take advantage of the new setting we have defined here.
IMPORTANT – don’t forget to set the Registry Action to run as “System” rather than “Current User”, as it is an HKLM entry the user will not have the privileges to update an HKLM value!
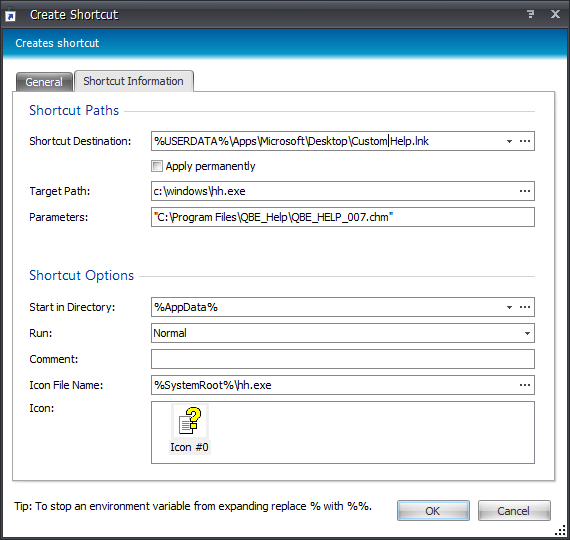
So next we will use the Create Shortcut Action to create a shortcut to generate our Pinned Item from. We’ve placed it on the Desktop as we are going to remove it afterwards
Now we will need to programatically create the Pinned Item on the Taskbar. As many of you probably know, a Pinned Item on the Taskbar is a shortcut in %AppData%\Microsoft\Internet Explorer\Quick Launch\User Pinned\Taskbar – but you can’t just create this and expect it to work. It also requires the settings from HKCU\Software\Microsoft\Windows\Current Version\Explorer\Taskband to complement this in order for the Pinned Item to display successfully. As it becomes extremely fiddly to import the Registry settings along with the shortcut – and bearing in mind that the Registry settings will change as and when users add new Pinned Items of their own – it’s much easier to do this using a scripted action of some sort. There are VBScript and PowerShell examples available to achieve this. We are going to use the PowerShell method, but it might be nice to have the capability to Pin shortcuts built in to Environment Manager natively, so consider that a feature request 🙂
PowerShell doesn’t have a native cmdlet to Pin items – but there is a good PowerShell module available on Microsoft’s website. This code will need to be copied and saved to a .psm1 file so you can import it into your PowerShell script. I’ve saved the file with this code in as D:\PinnedApps.psm1 (mainly because D: is a persistent drive on my servers), but you can set the file path to whatever you require.
Next we need to put a Custom Action nested under the Create Shortcut Action which then imports this PowerShell module and runs the command to pin the shortcut to the Taskbar
import-module D:\PinnedApps.psm1
Set-PinnedApplication -Action PinToTaskbar -FilePath “$env:USERDATA\Apps\Microsoft\Desktop\Custom Help.lnk”
Note that the above command has wrapped on the second line for readability. Also note I am using a path to a redirected Desktop – change the -FilePath parameter as necessary for your environment.
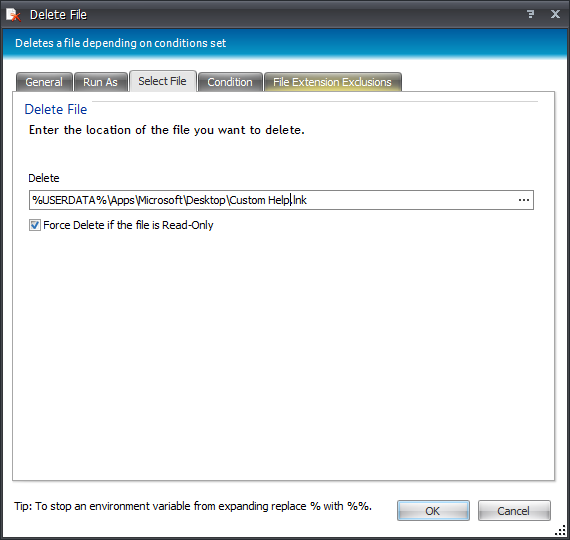
Finally, we can then delete the shortcut we have created earlier as it is no longer necessary, and will not affect the functionality of the Taskbar Pinned Item once we remove it.

…and as you can see, it has functioned exactly as we wanted! Whew!
One final note on this. The PowerShell script that does the Pinning relies on the presence of the verbs in order to operate successfully. There is a Group Policy Object that disables Pinned Items, so if this is active, the configuration we described won’t work. The GPOs in question are
User Configuration | Start Menu and Taskbar | Remove Pinned Programs from the Taskbar
User Configuration | Start Menu and Taskbar | Remove Pinned programs from the Start Menu
If you did need to deploy a Pinned Item and then disable the functionality so that users could then not pin any more items, you could simply apply these Group Policy Objects after the Actions we configured above had run successfully – which is another advantage the AppSense method has over traditional Group Policy application.

