
So, we’ve started the process of cloud-enabling our applications and our data. For most people the future will be hybrid cloud, but for the applications and data that we can put up there, we have in most cases already begun this process. Exchange in the cloud via Office365 is the most popular, but other services – such as IM – are also being added. From a data perspective, we’re all familiar with Enterprise File and Sync (EFSS) services like DropBox, DataNow, OneDrive and many, many more. Applications-wise, preparing for Windows 10 by virtualizing applications is becoming increasingly common, and tech like Cloudhouse, Numecent Cloudpaging and Turbo.net are leading the way in making these applications available anywhere. But of course, sitting between our applications and our data, intersecting them and providing the key part of the user experience, is the profile itself.
What makes up the user profile? Here’s a slide lifted from my recent presentation at the XenAppBlog Virtual Expo where I did a quick dive into the guts of the Windows profile itself.
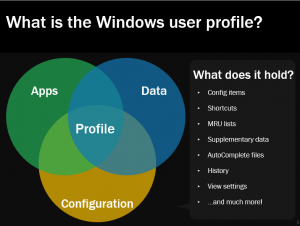
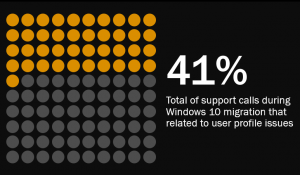
Now, without applications and data the profile itself is essentially useless, but because of all the configuration files, supplementary data and other key parts of the user experience that sit within the profile, it is vital in tying the applications, data and configuration together. You’d be surprised how many support calls during a recent Windows 10 rollout we saw that actually dealt with profile-related issues. Here’s another slide from my Virtual Expo presentation (which, on a side note, is a really great free event and definitely worth a few hours of any techie’s time).
Now some software is moving away from storing settings within the profile and tying them to specific accounts, but for the majority of enterprise stuff out there, the profile still has a big part to play. And because of this – and the relentless focus on apps and data that often means the profile is left out as a poor relation – it’s clear that managing our profiles needs to be done better. There’s a wealth of solutions in this area that can deal with this, on a number of different levels, but I’m not about to get into having a bake-off or comparison. What I want to concentrate on is whether we can move these profiles into Azure or another cloud-based system with a minimum of effort and maintenance. From this, we could gain an essentially cloud-native profile management solution, so users could log onto an on-premises device and make settings changes, then pick up a laptop which hasn’t touched the corporate network (or maybe even can’t touch it) and then see their settings updated down onto it.
Now of course, because the profile ties in so closely with applications and data they need to be consistent too, but if you’re adopting tech along the lines of anything like App-V, Cloudhouse, Unidesk (now Citrix App Layering), AppVolumes, FlexApp, Turbo, Numecent, Frame or any one of admittedly loads of vendors, you should already be able to deliver applications to different form factors and connectivity profiles with a minimum of effort. The devices we are using need to be domain-joined in order to activate the user context, but apart from that there shouldn’t be too many pre-requisites. We are going to take some Windows 10 machines built from the same image and try to set up a cloud-based method for dealing with the profiles.
Software
We’re going to use one of the “lighter” profile management solutions to enable this, because we want it to be straightforward. In my mind, it came down to a straight fight between Microsoft User Profile Disks (free), and FSLogix Profile Containers (cheap). I wrote an article here about how to enable User Profile Disks for Windows 10 VDI, but to be honest UPD can be a bit fiddly and error-prone (as you can see from the comments on the article I did!), and Microsoft appear not to really care about them as a technology. Profile Containers uses more or less the same method as UPD but has the added bonus of compatibility back to Windows 7, some helpful management tweaks and features, and the fact that they’re well-supported by the vendor. However, a big factor was that I found it very difficult to configure UPD to connect to the cloud-based file share, whereas with FSLogix (as I shall show you) there is a tweak you can use to get around this fairly easily.
Cloud selector
We’re going to use Azure for this, because we have a Microsoft partnership and free Azure credits 🙂 However, it should hopefully be portable to any of the major cloud players.
Pre-requisites
So, you may be thinking that first of all we need to build a cloud-based Windows file server in Azure, then stand up a federated Active Directory domain controller in there to support authentication, then set permissions and…but no, we don’t need any of that. And to be honest, that sounds like a bunch of work (and potential charges for the server instance). But that’s not what we need, there is a simpler way. So before we start we’ve set up:-
- Windows 10 image (CBB, fully patched) with the latest FSLogix Apps agent installed and joined to the domain, deployed to required number of test endpoints
- An Azure account
- A working Active Directory (can be on-premises, no need for Azure DCs)
- Firewall rules configured to allow traffic to your Azure Storage Account share (the crucial one being outbound port 445, as far as I can tell)
And that’s it!
Azure storage accounts
Azure Storage Accounts provide an SMB-enabled file share in Azure intended for application access. We are going to leverage these to hold our user profiles.
Log on to the Azure Portal
Click on Storage Accounts
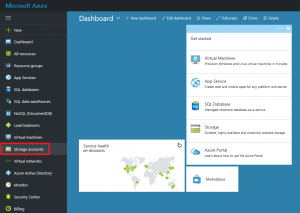
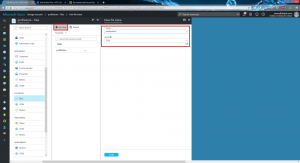
Click on Add
Set up the options as required, paying particular attention to those options highlighted
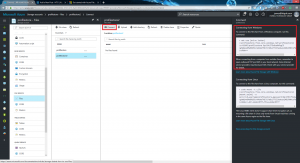
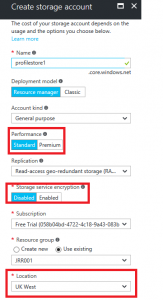 The Performance option can be set to Standard or Premium. You may need to test between these two, but I found Standard to be OK in my testing.
Encryption is obviously a big desirable, in my testing I left it turned off but you may very well want to activate this option.
Location is very important because it deals with where your user data is being stored. I’ve chosen UK because obviously we are UK-based.
It’s also important to note at this stage you should always configure Folder Redirection for data storage folders like Documents, Pictures, Music and the like, otherwise all of that data will end up getting written into the Azure file share which is possibly not the best place to be sending such files. Other folders should be considered for redirection also, such as Downloads and Favorites. One folder not to redirect, though, is the AppData folder – leave that within the profile itself.
Once this is set up the way you want it click the Add button and the storage account will be deployed.
Next you need to set up a file share within your storage account by going to the Files section within the storage account overview screen and clicking File share. At this stage you also need to put a quota on the file share up to a maximum of 5120 GB.
The name of the “server” you will connect to is usually profilestorename.file.core.windows.net. To get the command for access, you need to view the file share you have just created and click on the Connect button, which will provide a net use (yes, old school!) command for connecting to the file share using a dedicated access key. Whatever you do, DON’T share the access key with anyone you shouldn’t – the one shown in the image below has been changed, before anyone decides to get up to any mischief with it 🙂
Take a copy of this net use command because you will need it later.
FSLogix setup
Now, to get FSLogix to be able to write the FSLogix profile to the Azure file share we need to make a few changes.
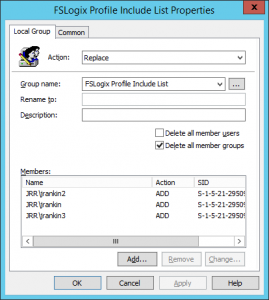
Firstly, you should set up a Group Policy Preference that populates the FSLogix Profile Include List local group with the users you want to deploy this to. You also need to make sure these users don’t have roaming profiles defined in AD or any other profile management tool associated with them.
Next, because FSLogix is going to attach to an Azure file share, we need to make a few changes.
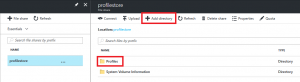
Firstly, create a subfolder in your Azure file share to hold the profiles. I’ve made one called Profiles (simply use the Add Folder button as below)
Next, set the Registry value via GPP that tells the FSLogix software where to try and store the profiles for the users.
- HKLM\Software\FSLogix\Profiles
- Value – VHDLocations
- Type – REG_MULTI_SZ
- Data – \\YOURPROFILESTORE.file.core.windows.net\YOURSHARENAME\YOURFOLDERNAME
Now, the next part is key. In order to be able to access this share, we need to set up a few extra things.
Remember that net use command we saved earlier? You need to copy this into Notepad, replacing [drive letter] with the one you’ve chosen (I used X:). Then save it with a .cmd or .bat extension and place it on the network somewhere it can be accessed by all machines. Here’s the command we used
net use X: \\profilestore.file.core.windows.net\profilestore /u:profilestore IfYouThinkIAmPostingTheRealKeyHereYouAreOffYourRockerMate
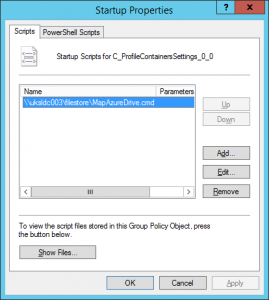
Next, set up a Group Policy Object Startup Script to run the .bat or .cmd command as your target endpoints boot up. This will authenticate to the file share as drive X: for the SYSTEM context.
Finally (and this is the kicker to make it work), set the following Registry value so that FSLogix connects to the file share in the machine context rather than the user context.
- HKLM\Software\FSLogix\Profiles
- Value – AccessNetworkAsComputerObject
- Type – REG_DWORD
- Data – 1
Once these settings are deployed along with the software and your Azure file storage account, you should be ready to test.
Testing
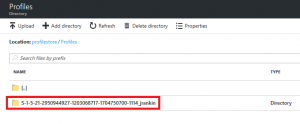
Log on to the machine with FSLogix installed as a user configured to use it. Make sure the user doesn’t have a pre-existing profile. A new Windows 10 profile should be created. All being well, you should see a folder with the user’s SID and username created within the folder in the Azure share.
Make a bunch of changes to your desktop – anything you like, Pinned Items, Start Tiles, desktop background, whatever takes your fancy. Log out and the user profile should not be saved onto the local machine.
Now log on to another Windows 10 image. You should see your profile replicated exactly onto the second machine! Any changes you make are saved up automatically into your Azure file share and can be accessed whenever this user logs onto a domain-joined Windows 10 system!
Caveats and considerations
Obviously the machines need network connectivity to access the profile. Laptop users may need to have the FSLogix Registry value of KeepLocalDir set to a DWORD of 1 to mitigate against situations where a network connection needs to be specifically connected to (like hotel wireless).
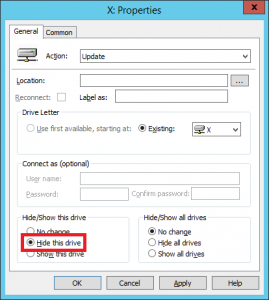
From a security perspective the user doesn’t have access to the parent folder of their user profile so they should be unable to access other profiles. The X: drive mapped for SYSTEM is visible in the filesystem but is inaccessible without the access key. To remove this, I configured a Group Policy Preference to hide the X: drive for all users.
From a security perspective encryption is desirable as well, and you absolutely need to keep the access key away from intruders! You can request a new key for the share via the Azure portal if you feel it has been compromised, and then you simply need to update the script that maps the drive for the SYSTEM account.
Cost-wise Azure Storage Accounts are much better than standing up VM infrastructure to host it, and a lot less effort is involved. If someone suddenly uploads 30,000 user profiles to one of these Microsoft may reconsider their usage, but right at the moment, they’re a great option.
FSLogix Profile Containers also support multiple concurrent sessions if you use the ConcurrentUserSessions Registry value (see here for all the Registry keys). They basically use a differencing disk to overcome this.
Obviously this tech only supports profiles of the same version (v6 as used here works for Windows 10 AU and Server 2016). If you needed multiple profile versions, I’d recommend creating subfolders under the main Profiles folder. So redirect Windows 7 machines to \\AZURE\SHARENAME\Profiles.v2, Windows 8.1 to \\AZURE\SHARENAME\Profiles.v4, Windows 10 to \\AZURE\SHARENAME\Profiles.v6, and so on, to keep everything neat. You could use Group Policy Preferences to set the Registry value based around the client operating system version with no trouble at all.
I think this is a great way of using Profile Containers to make your profiles truly “cloud-native”. I haven’t tested this at scale or with complicated applications, and you will need to measure the performance before sending it live, but I didn’t notice any appreciable difference here. Domain-joined machines can now log on from anywhere and get their profiles from a highly-available, low-cost Azure-based SMB file share. Give it a try and let me know what you think!
I will be making a video of this that probably will get posted in the next few days (video now available here), although I am attending the Citrix User Group in Birmingham so may be slightly delayed in this.

